I seriously thought people would be sick of this technical column by now, but it seems not. I always aimed for it to have a little useful information in each, presented in a reasonably entertaining way. Unfortunately they were tedious beyond measure and I am genuinely surprised that no one has told me to shut up yet. Since nobody has, this months will break new ground with its tedium. If anyone has any requests for future ones (assuming this one doesn’t finish the whole idea off) then I would be interested to hear from you…
Your frame is always the heart of your bike. It takes all the forces from the wheels to you and back again, efficiently constructed from thin wall tubes those few pounds of alloy steel do a lot of work for you. Each tube is carefully cut to fit its neighbour and then lovingly welded in place. Stresses flow smoothly around the structure, which acts like a delicate eggshell. The 1mm (or so) thick steel is a nice high strength alloy with a great capacity for soaking up impact energy and stress. So how do we fix the wheels to this delicate, graceful, efficient, sculpture? Simple, we weld an effing great plate of steel in each corner and cut a slot in it! Bung the wheel in and tighten a couple on nuts (or bolts). Dropouts are a bit crap. They contribute a huge amount of weight and almost seem to be taking the piss out of the rest of the frame. As if this wasn’t bad enough they STILL aren’t up to the job! The lovely tubular stays carry huge loads 12” or more with no problem and weigh next to nothing. The dropouts only have to move loads a few inches and always seem to be bending one way or another!
There are a few things that can be done to improve this situation. Lots of people have noticed that one of the biggest problems comes from the bit of dropout you don’t even need! Most frames have a long dropout, most of which sticks out behind the peg doing precisely nothing. There is no load on it until you land an icepick on it. Then it acts as a long lever helping to bend the dropout slot shut or the whole dropout sideways. Since this bit of dropout isn’t really necessary anyway, a lot of people just hack the bugger off. Five minutes with a hacksaw and voila! Less weight, and less chance of bending the rest of the dropout. Unfortunately as you hacked off the dropout you also hacked off the guarantee (if any). Some manufacturers are rumoured to have refused warranty claims on downtube cracks because the dropout was cut! Since lots of manufacturers don’t give any kind of guarantee anyway and many more aren’t worth that much or only last 3 months it’s no great loss, but don’t say I didn’t warn you!
Some manufacturers have tried to address the problems with dropouts at the source. The ‘Omen’ for example has tiny tiny little dropouts with almost no room for adjustment; its like some keen, but mechanically skilled, BMX’er has previously owned the frame and cut the dropouts right back to suit his set-up, which in a way isn’t that far off being the case… GT tried a variety of wacky designs to combat bent axles and dropouts and the new super-expensive Specializeds look to have something similar going on…
Of course there is another problem with dropouts… How many of us have experienced bizarre movements when trying to put the back wheel on? You get the wheel in the middle, with the chain reasonably tight, but as you tighten the wheel nuts it moves out of alignment. No matter how hard you try it wonders to a position where the chain is loose and the wheel rubs the stays! The cause of this is subtle but easily fixed, unfortunately it requires a tedious elaboration to explain.. When a frame is welded it sometimes distorts slightly, the chain stays can spread apart slightly or pull together. This makes some riders think that they need to put spacers inside the dropouts or take spacers away till the wheel fits, but this causes more problems than it solves. When the frame distorted the dropouts didn’t just move evenly apart, the whole stays ANGLED apart. The dropouts are therefore no longer parallel. If you bung your wheel in there with spacers to make up the gap then there is going to be a conflict. Assuming the axle is straight then the faces of the cone-nuts or spacers are parallel to each other. Since these have to mate up to the faces of the dropouts something has got to give. Either the axle has to bend or the dropouts bend or a bit of both. If you tighten one side first, then the wheel will line itself up to that dropout, but be way out of line compared to the frame.
If you suspect that your dropouts are not parallel then check them. All you have to do is measure between the front edges of the dropouts and then compare it to the distance apart at the back of the dropouts. If this dimension is even only 1mm different then you should look at sorting it out. Sorting it out is usually dead easy. Suppose you take the wheel out and measure the dropout spacing and it turns out that the dropouts are wider apart at the back than the front. The easiest thing is to squeeze the dropouts slowly together with a clamp or an old axle, keep measuring until they are the same, then make a note of the distance (it should be about 110mm in most cases). Because the distortion is a long way from the dropouts the change in width to get rid of the misalignment can be surprisingly large. It is not unusual for a 1mm difference in dropout spacing front to back to need 6mm or so of spacers removing to correct.
Once you find the right width just set your hub to that width by removing or adding spacers. When you take the clamp off, the dropouts will spring back to their normal “wrong” position, but that’s no problem. Put your wheel is with the right number of spacers and tighten the nuts, you should see an immediate improvement. If the dropouts are wider apart at the front than the back then spread the dropouts with an axle and repeat the steps as above. If the dropouts need spreading then it is going to make putting the wheel in a “real pain in the arse”. To remedy this you can use a car jack to “cold set” the frame back to its correct position. “Cold set” is a fancy way of saying “force”. Just put the jack in the dropouts and open it out slightly. There tends to be a lot of spring in the back end of a BMX frame (all that lovely thin tube for you) so you will need to open the frame out beyond the point you want it to “set” at. Take your time and eventually you will get it where you want. However you MUST be careful with “cold setting” the frame like this, there is always a risk that one side will bend out more than the other, leaving you with a bent frame where the wheel does not line up with the rest of the frame… Again, don’t say I didn’t warn you….
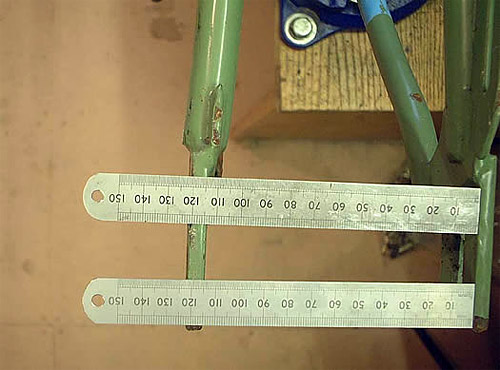
Example:
In the example you can see that the dropouts look OK. The front measurement is just under 114mm and the back is just over 115mm. Not much of a difference? Well actually it is, that 1mm discrepancy is over a length of just 50mm or so and will cause a surprising amount of trouble.
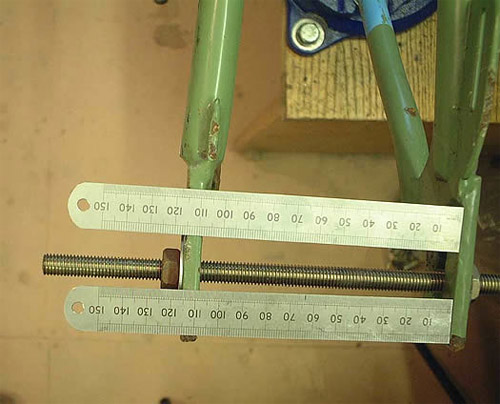
With an old axle or similar to pull the dropouts together they have to be pulled all the way in to about 109mm to get the measurements the same.
Figure 1. Here you can see some typicl out of line dropouts. The seperation of the dropouts is larger than I would expect at around 114mm. Although to the naked eye they look parrallel a careful measure shows up a discrepancy of 1mm in the seperation over this small sample length. Although this doesnt seem a lot it is about 2 degrees which is going to try to force the axle to bend the same amount.

Figure 2. By setting the axle of the hub to the right length (rather than the more common but wrong practice of adding washers) the dropouts are pulled back to parrallel. This may seem wierd when tightening the wheel nuts but will result in much less strain on the axle and the wheel being much much less likely to slip in the dropouts. (note it has ended up at the standard 108mm spacing).

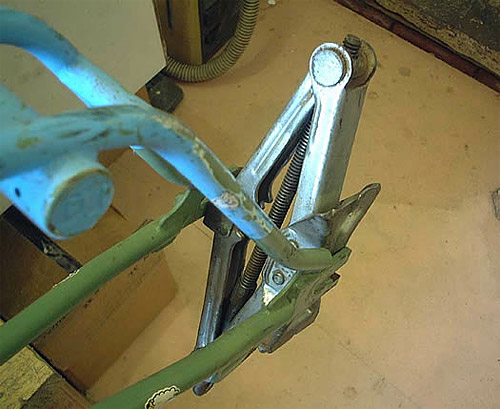
If on the other hand your dropouts need to be spread to get them parrallel then this is one way to do it. This is what you would do if the dropouts were closer together at the back than the front. DO NOT simply do this to force a wide hub into correctly spaced dropouts or you will be making things worse…
